Over the last several weeks we had a pleasure of helping several individuals with their dilemmas regarding gun belts, specifically, for lack of better words Tactical Sub-Load Belt, also known as Combat, War, or Operator Belt. We just want to create post to share with you some of the things that we shared with them and hopefully contribute something useful to the users of this forum. Some of the contents of this post can come across as basic knowledge. For those that it does, please be considerate for those it does not, after all, when it comes to your safety, money, and investment there is no such a thing as a stupid question. Finally, these are our opinions based on experience and knowledge and are not a point of view of nor promote any one particular manufacturer.
This post we address following topics:
-Difference Between a Tactical Sub-Load Belt and Duty Belt.
-General Features of a Sub-Load Belt
-Belt Size Selection
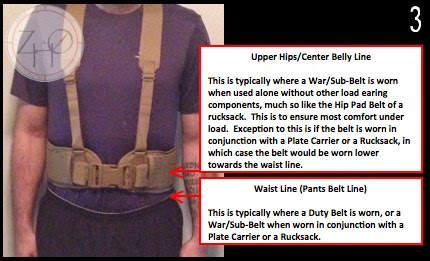
-Belt Placement
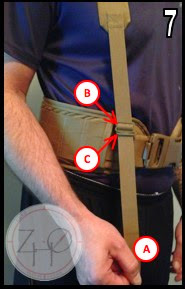
-Belt Adjustment
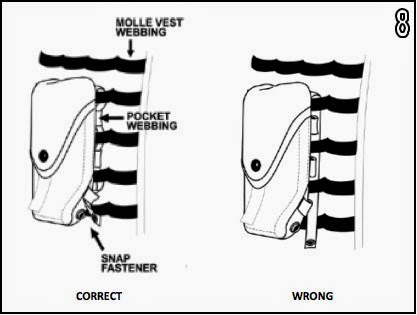
-Attachment of PALS (MOLLE) Components
DIFFERENCE BETWEEN A TACTICAL SUB-LOAD BELT AND DUTY BELT
Gun belts generally fall into three categories: Sub-Load Belt (Tactical/Mil), Duty Belt (Police Patrol), and Conceal Carry (Pants Belt Reinforced). The Sub-Load Belt is also referred to by various manufacturers and military departments as a Combat, War, or Operator Belt. For the purpose of this post we will refer to it as a Sub-Belt. Sub-Belt and Duty Belt have the same primary purpose, which is to provide the end user with a load carrying capability for various pouches and equipment. However, where they differ is in appearance, which influences the method of belt employment, i.e. how you wear it. The Duty Belt is the primary means for Police personnel to carry their duty load, as it provides a more conservative nature to carry equipment that can be perceived by public to be intimidating, i.e. handgun, baton, etc. This is important for the Police as they have to be approachable by the public. Just think, if every Police officer was dressed as S.W.A.T. or H.R.T. officer the public will likely be deterred from approaching them and possibly even accelerate publics fears of threats, which then spin-off into issues from second and third order of effects. Because of the conservative appearance nature of the Duty Belt, Duty Belt is mounted to the pants belt and secures via straps, Velcro, or combination. There are Federal government funded studies to improve the comfort and load distribution of a Duty Belt in order to reduce work related injuries stemming from the Duty Belt, most notably one contracted to Blackhawk Products Group to conceal suspenders within the uniform. The conservative nature is not important for the Sub-Belt, thus it is more mission specific and worn for comfort and practicability, this typically translates to padding and suspenders. Another difference between the Sub-Load Belt and Duty Belt is the modular nature. Typically, the pouches designed to attach to the Duty Belt can only be attached to the belt and not any other load carrying platform. The pouches being attached to the Sub-Load Belt are designed to be interchangeable between various platforms, such as Plate Carriers, Drop Leg Panels, or Vests/Chest Rigs. Additionally, Sub-Load Belt is typically designed to be able to wear independently or in conjunction with Plate Carriers, Vests/Chest Rigs, and/or Rucksacks/Backpacks, based on the needs of the end user.
GENERAL FEATURES OF A SUB-LOAD BELT
-They are designed to carry heavy loads, which can be further supported with the suspenders.
-Most are foam padded and typically includes a mesh on the inside of the belt for comfort and breathability.
-They typically include rectangular rings for suspenders, harness, and/or backpack attachment.
-They are typically secured via plastic buckle on a fully adjustable waist strap.
-Some are compatible with Rigger Belts or Cobra Buckle Belts, meaning they are just a padded platform that you need to provide your own belt for or are designed to allow for removal of the waist band in order to put in a belt desired by the end user for various purposes, ranging from preferred locking method to rigging abilities. Most notable belt, that allows such configuration are:
1. Eagle Industries - Operator Belt
2. Crye Precision - Blast Belt and AVS Belt
3. Blue Force Gear - SOC-C Modular Padded Belt
4. First Spear - Padded Sleeve for Assaulter Gun Belt (Belt Not Included)
It is important to note that these belts are still not designed to be worn with the pants belt, instead they provide an alternative method of securing the overall platform.
-They are designed to provide a carrying platform for drop leg holsters and panels.
-They provide an alternative load carrying platform to Plate Carrier or Vest/Chest Rig
-They typically provide PALS (MOLLE) attachment point for a minimum of 75% of the belt surface.
PALS Background: PALS stands for Pouch Attachment Ladder System (PALS) that was designed by U.S. Army. It is a grid of 1 inch webbing used to attach components to a load bearing equipment. Socially and in some civilian markets PALS is often, almost always, referred to as MOLLE. However, MOLLE is a designation of a set of load bearing components. MOLLE stands for Modular Lightweight Loadbearing Equipment (MOLLE). MOLLE was designed to replace the Vietnam Era All-Purpose Lightweight Load Carrying Equipment (ALICE). First generation of MOLLE was issued to both U.S. Army and U.S. Marine Corps. It was subsequently improved and adopted by U.S. Army, designated as MOLLE II, while U.S. Marine Corps developed specific set designated Improved Load Bearing Equipment (ILBE) and subsequently updated to Family of Improved Load Bearing Equipment (FILBE).
Other widely used and/or known load bearing sets that use PALS include, but not limited to:
-Special Force Load Carrying System (SFLCS); issued to U.S. Army & U.S. Marine Corps Special Operating Forces.
-Maritime Load Carrying System (MLCS); issued to U.S. Navy SEAL, SWCC, and EOD units.
-Defensor Fortis Load Carrying Kit (DFLCS); issued U.S. Air Force security forces.
-Full Spectrum Battle Equipment II (FSBE II); issued to U.S. Marine Corps reconnaissance, EOD, and Security Forces.
Several of manufacturers have attempted to improve the PALS and in the process developed their own patented variations of PALS, most notably Blue Force Gears Helium Whisper and MOLLEminus and First Spears 6/9 and 6/12 Modular Pocket Technology.
BELT SIZE SELECTION
The Sub-Belt sizes are general in nature as they are not made to be worn over a pants belt like the Duty Belt. The general sizes are based on pants waist measurement and typically are bracketed ranges. Some manufactures do not list the actual ranges, thus when purchasing one it is best to try it on or ask the reseller for the ranges. If the ranges are unknown by the reseller, try the manufacturers website as some manufacturers have a product data sheets and/or standard sizing charts available for download or viewing. Following are general sizes observed for Sub-Load Belt that allow for proper use of suspenders with the belt:
Label/Waist Range
Small/28-31
Medium/32-35
Large/36-40
Please Note: For demonstration purposes, throughout the remainder of this post, we used the Sub-Load Belt manufactured by Propper International and part of Eagle Industries designed standard issue U.S. Marine Corps Family of Improved Load Bearing Equipment (FILBE). Some methods depicted below may or may not work with your belt, based on the design of the retention of the waist band/belt and suspender.
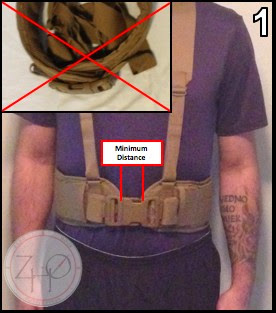
When fitting for the belt, the buckle of the belt should not tighten to the point where the pads are overlapping (PIC 1). This will ensure that there is enough room for flex, as well as avoiding discomfort and irritation due to two pads rubbing and/or pressure from overlapping pads.
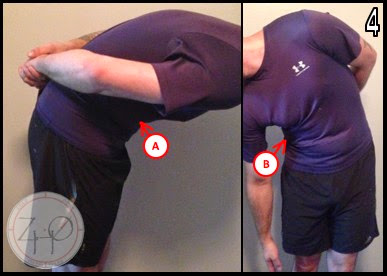
When fitting for the belt, the suspenders should not pass the front of the arm when you place it straight down the side of your body (PIC 2).

This post we address following topics:
-Difference Between a Tactical Sub-Load Belt and Duty Belt.
-General Features of a Sub-Load Belt
-Belt Size Selection
-Belt Placement
-Belt Adjustment
-Attachment of PALS (MOLLE) Components
DIFFERENCE BETWEEN A TACTICAL SUB-LOAD BELT AND DUTY BELT
Gun belts generally fall into three categories: Sub-Load Belt (Tactical/Mil), Duty Belt (Police Patrol), and Conceal Carry (Pants Belt Reinforced). The Sub-Load Belt is also referred to by various manufacturers and military departments as a Combat, War, or Operator Belt. For the purpose of this post we will refer to it as a Sub-Belt. Sub-Belt and Duty Belt have the same primary purpose, which is to provide the end user with a load carrying capability for various pouches and equipment. However, where they differ is in appearance, which influences the method of belt employment, i.e. how you wear it. The Duty Belt is the primary means for Police personnel to carry their duty load, as it provides a more conservative nature to carry equipment that can be perceived by public to be intimidating, i.e. handgun, baton, etc. This is important for the Police as they have to be approachable by the public. Just think, if every Police officer was dressed as S.W.A.T. or H.R.T. officer the public will likely be deterred from approaching them and possibly even accelerate publics fears of threats, which then spin-off into issues from second and third order of effects. Because of the conservative appearance nature of the Duty Belt, Duty Belt is mounted to the pants belt and secures via straps, Velcro, or combination. There are Federal government funded studies to improve the comfort and load distribution of a Duty Belt in order to reduce work related injuries stemming from the Duty Belt, most notably one contracted to Blackhawk Products Group to conceal suspenders within the uniform. The conservative nature is not important for the Sub-Belt, thus it is more mission specific and worn for comfort and practicability, this typically translates to padding and suspenders. Another difference between the Sub-Load Belt and Duty Belt is the modular nature. Typically, the pouches designed to attach to the Duty Belt can only be attached to the belt and not any other load carrying platform. The pouches being attached to the Sub-Load Belt are designed to be interchangeable between various platforms, such as Plate Carriers, Drop Leg Panels, or Vests/Chest Rigs. Additionally, Sub-Load Belt is typically designed to be able to wear independently or in conjunction with Plate Carriers, Vests/Chest Rigs, and/or Rucksacks/Backpacks, based on the needs of the end user.
GENERAL FEATURES OF A SUB-LOAD BELT
-They are designed to carry heavy loads, which can be further supported with the suspenders.
-Most are foam padded and typically includes a mesh on the inside of the belt for comfort and breathability.
-They typically include rectangular rings for suspenders, harness, and/or backpack attachment.
-They are typically secured via plastic buckle on a fully adjustable waist strap.
-Some are compatible with Rigger Belts or Cobra Buckle Belts, meaning they are just a padded platform that you need to provide your own belt for or are designed to allow for removal of the waist band in order to put in a belt desired by the end user for various purposes, ranging from preferred locking method to rigging abilities. Most notable belt, that allows such configuration are:
1. Eagle Industries - Operator Belt
2. Crye Precision - Blast Belt and AVS Belt
3. Blue Force Gear - SOC-C Modular Padded Belt
4. First Spear - Padded Sleeve for Assaulter Gun Belt (Belt Not Included)
It is important to note that these belts are still not designed to be worn with the pants belt, instead they provide an alternative method of securing the overall platform.
-They are designed to provide a carrying platform for drop leg holsters and panels.
-They provide an alternative load carrying platform to Plate Carrier or Vest/Chest Rig
-They typically provide PALS (MOLLE) attachment point for a minimum of 75% of the belt surface.
PALS Background: PALS stands for Pouch Attachment Ladder System (PALS) that was designed by U.S. Army. It is a grid of 1 inch webbing used to attach components to a load bearing equipment. Socially and in some civilian markets PALS is often, almost always, referred to as MOLLE. However, MOLLE is a designation of a set of load bearing components. MOLLE stands for Modular Lightweight Loadbearing Equipment (MOLLE). MOLLE was designed to replace the Vietnam Era All-Purpose Lightweight Load Carrying Equipment (ALICE). First generation of MOLLE was issued to both U.S. Army and U.S. Marine Corps. It was subsequently improved and adopted by U.S. Army, designated as MOLLE II, while U.S. Marine Corps developed specific set designated Improved Load Bearing Equipment (ILBE) and subsequently updated to Family of Improved Load Bearing Equipment (FILBE).
Other widely used and/or known load bearing sets that use PALS include, but not limited to:
-Special Force Load Carrying System (SFLCS); issued to U.S. Army & U.S. Marine Corps Special Operating Forces.
-Maritime Load Carrying System (MLCS); issued to U.S. Navy SEAL, SWCC, and EOD units.
-Defensor Fortis Load Carrying Kit (DFLCS); issued U.S. Air Force security forces.
-Full Spectrum Battle Equipment II (FSBE II); issued to U.S. Marine Corps reconnaissance, EOD, and Security Forces.
Several of manufacturers have attempted to improve the PALS and in the process developed their own patented variations of PALS, most notably Blue Force Gears Helium Whisper and MOLLEminus and First Spears 6/9 and 6/12 Modular Pocket Technology.
BELT SIZE SELECTION
The Sub-Belt sizes are general in nature as they are not made to be worn over a pants belt like the Duty Belt. The general sizes are based on pants waist measurement and typically are bracketed ranges. Some manufactures do not list the actual ranges, thus when purchasing one it is best to try it on or ask the reseller for the ranges. If the ranges are unknown by the reseller, try the manufacturers website as some manufacturers have a product data sheets and/or standard sizing charts available for download or viewing. Following are general sizes observed for Sub-Load Belt that allow for proper use of suspenders with the belt:
Label/Waist Range
Small/28-31
Medium/32-35
Large/36-40
Please Note: For demonstration purposes, throughout the remainder of this post, we used the Sub-Load Belt manufactured by Propper International and part of Eagle Industries designed standard issue U.S. Marine Corps Family of Improved Load Bearing Equipment (FILBE). Some methods depicted below may or may not work with your belt, based on the design of the retention of the waist band/belt and suspender.
When fitting for the belt, the buckle of the belt should not tighten to the point where the pads are overlapping (PIC 1). This will ensure that there is enough room for flex, as well as avoiding discomfort and irritation due to two pads rubbing and/or pressure from overlapping pads.
When fitting for the belt, the suspenders should not pass the front of the arm when you place it straight down the side of your body (PIC 2).