First i would like to say that this is my FIRST hide to ever tan, this is not a set in stone "how you are suppose to and there is no other way". the steps that i followed were off and instructional video threw McKenzie tanning. the video was a great help and my hide came out great..atleast to me. my overall learning would say depending on the time of day you start and the temperature you are working at will make a difference in the overall time spent. the entire process to my likeing was roughly 10 days. i feel that if the weather was warmer it would of helped out. my average temperature in my shop was 45*-56* in the day and droped into upper 20's-30* over night. i did fire up my wood burning stove to get up to 60-65* that did help out.
here is my write up for how i did things, this will start out with the tools and supplies i used and also from the very beginning (skinning) to the end (pelt is very, very soft)......
PRODUCTS/SUPPLIES
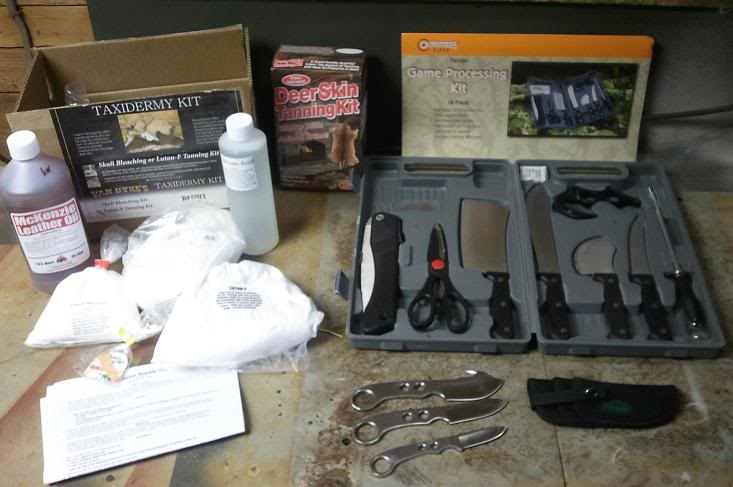
here is pic of my supplies and tools used. starting from left to right
-Van Dykes Lutan F kit ($30)= http://www.vandykestaxidermy.com/K7101-P177C207.aspx (i did not use this kit but will for my deer hides that i have)
-Mckenzie Deer Skin tanning kit with video/the package also has a bottle of tan and a bottle of oil, plenty to do a couple furs ($30)= http://www.vandykestaxidermy.com/DSK-P173.aspx (i recommend this for the beginner, this is the product i am using threw out this first project)
-Outfitters Game Processing Kit ($25). nice entry level kit, the scissors are great to have.
-Remmington 3pcs skinning knife kit ($35). i know nothing about knives. but these were very easy to use and fit my hands great. also the added bonus was the small hole in the end to keep on my finger when not using them. very nice knives!
-a container to "pickle" the hide. the hide must be able to float. a small 10gallon bucket could work for a coyote. i bought 2 big storage bins on sale after christmas for about $5 a piece.
-vinegar $1 a gallon
-salt--MORTON or SEA SALT i used both $.38
-Plastic gloves
-aprin or trash bag
-paint brush
optional--- small piece of 4" round PVC pipe (4 cost me $10) for me it was just about 2' long and a small piece of a 1"x6" board, and also a C clamp. these items together will make a great tool to help work on the hide. i recommend making something similiar because it would be hard work on a flat table.
PART 1
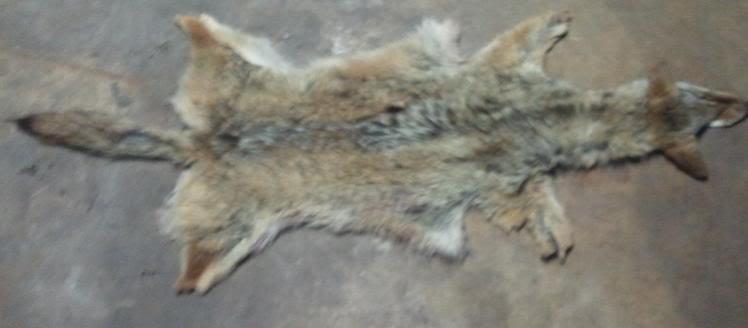
the hide i am working with is a young 1.5-2yr old female coyote, i shot her with my .223 about the first week of November and skinned her that night. i did not get to the skin till about a month later.
here is how I did my main cuts...
---have a nice sharp knife and have something to hang them like you are skinning/cutting up a deer--trust me this will save you time, espically if you are trying to get the entire head---
--start from the vent hole aka butthole and go all the way down its belly to his breast plate (lower part of neck). your needs to go threw that first thin layer of skin, you don't have to gut the thing.
*(FUR LINE= this is where the under belly color and main pelt colors start to meet)
--start at the hind legs first. finding a starting area on the hind leg either closer to the paw or higher up, what ever makes you sleep safe at night, that were to start. Cut around the leg at your mark. then cut along the fur line which runs along the back of his leg to its vent hole. repeat on the other leg.
--start pulling and cutting loose the pelt from the body and cut the tail off close to the base of the body. keep going till you get close to the front. since you are planning on tanning, keep as much "fat" on the body and not your pelt. trust me it will save you time.
--your next cut starts on the lower front legs or however high you want on the leg. cut all the way around the leg. starting from there go up along the fur line which runs kinda along the front inside of its legs, makeing your way up the leg to the cut you made from vent hole to lower neck. repeat on other leg
-- if you have made it this far, keep pulling and cutting its entire pelt down the neck till you get to the ears. cut around the base of the ears close to head. from there on just keep working your way around and pulling on the fur next thing you know it will all be off. from the lower neck to nose will look like a sock.
--lay the pelt out and start at the bottom of the tail cutting into the tail tissue and work your way to the tip. a sharp tip blade is really handy. you then should be able to grab the base of the tail tendon and pull upward BECAREFUL TOWARDS THE TIP, YOU COULD PULL THE END OFF, SO TRIM WITH KNIFE AS YOU GET CLOSE TO THE TIP OF THE TAIL.
--go to the bottom of the neck and start cutting straight up the neck to the bottom of the mouth. after my cuts were all done, i layed it all flat with meat side down and trimmed up things to look somewhat more symmetrical.
then take the skin and fold it so that the meat side touch each other (like folding a taco), roll the fur up and put in a trash bag and put it in the freezer till your ready. OR you can go buy some MORTON SALT or SEA SALT and cover the entire meat side. one 2lbs can of salt will cover thedog easily use it all. let the salt set for a couple hours (this allows to to "settle" in), then fold it up, roll it up and put it in freezer. i did not apply salt to mine, and got to tanning it about 1month later and everything still turned out fine, but salting it is the first step in tanning.
*****************
PART 2
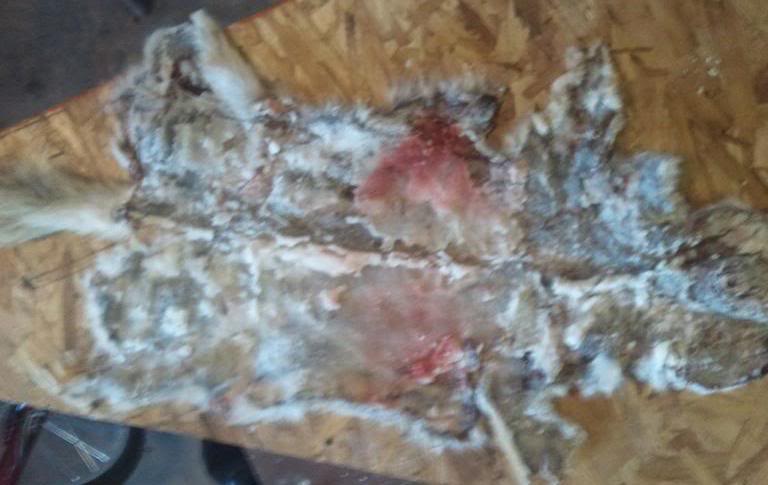
Since i did not salt the meat side before freezing my hide, i removed the hide from the freezer, let it set for roughly 6hrs till thawed out and applied 1 can (2lbs) MORTON salt to the entire meat side, don't be shy with the salt,
let the hide set out in the open with the salt applied for roughly 10hrs. the salts job is to dry out the hide by absorbing blood, tissues, membrain that is left on the hide after skinning.
After the setting time scrape all the salt off the hide into a trash can.
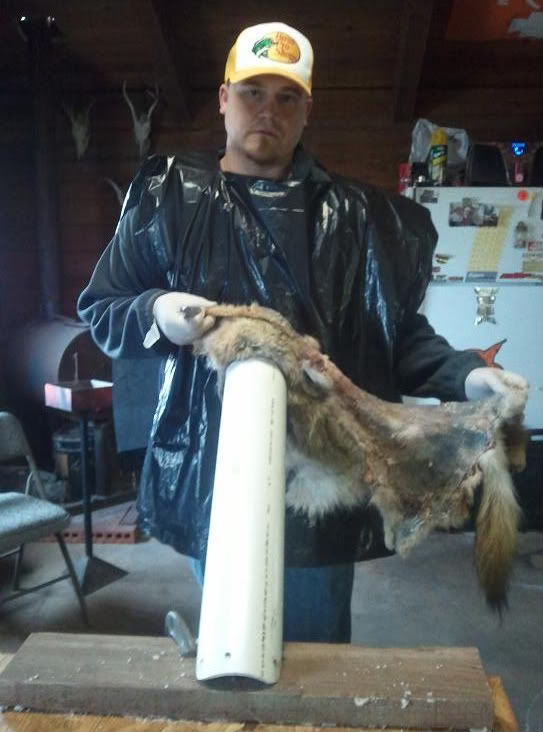
Here you can tell where the 4round pvc pipe and board come in handy. I simply angled cut both ends so that it gives me a comfortable way to work. First I pre-drilled my holes and I ran five 3 long decking screws around the base, to hold secure along the bottom to the scrap piece of 1x6 I had. Take the part by placing the 1x6 on the table and use a C clamp to hold in place. On the end that was to my stomach I rounded the edge over with my grinder, just so I might not snag and accidently tear/rip the hide.
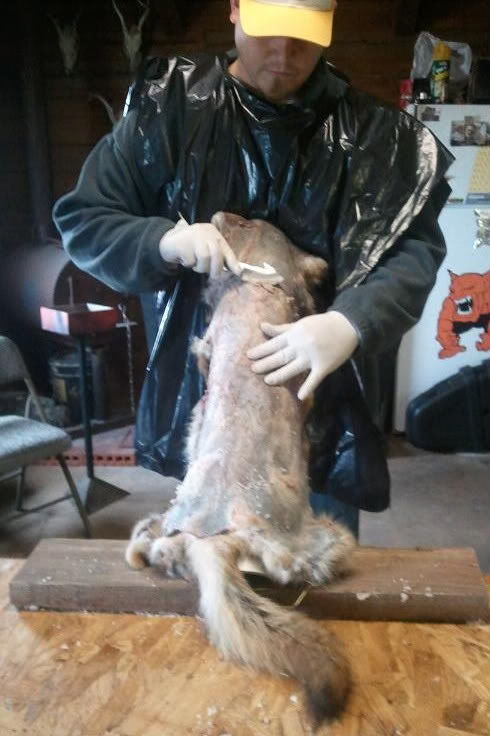
Simply lay the hide long ways and up by your stomach allow a little to hang over the PVC. Lean against that piece pinching the hide between your belly and PVC. Take your free hand and place it on the skin and pull it downward toward your table. This will help apply a little tension to make the cutting easier. When working on the hide work close to the body and work down roughly 4-6 at a time down. start removing the the first layer of membrain and tissue and or any fats that were left on after the skinning. This took me roughly 2hrs, but im sure on the next one it will go quicker because trust me, you get plenty of practice time in.

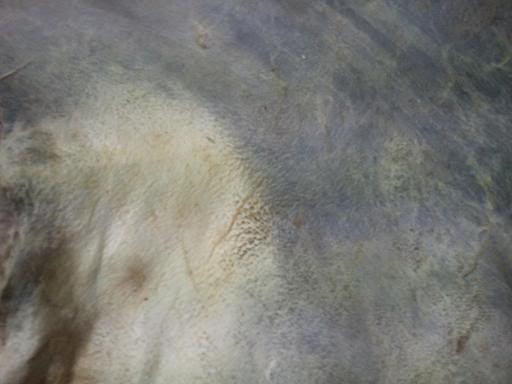
Here is what the first layer(s) should look like. The picture might not be the best but in some areas I got deep enough were I could see the roots of the hair. If you get this deep, it is a little too deep, try and not to go that far down, but really close to.
**if you kept the head on your skin; this is were a great pair of scissors comes in handy. You will want to trim the cartaledge out from behind the nose and up into the ear. I trimmed the nose so that when inside out it was pretty much level with hide. Also along the mouth cut the black lining close to the hide. Take your time and pay attention to your cuts.
After removing as much as I could, I layed the hide out on the table with meat side up and salted again, leaving it out in the open and this time I let the salt set 22hrs.
PART 3----PICKELING
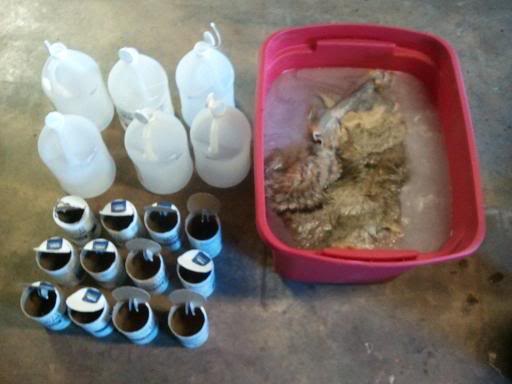
This is where you will need your container, remember the container needs to be big enough so that the hide can float. In the picture I went way overkill on the amount it takes to get the hide to float (I was unsure due to the shape of the container, and being a first timer). I did 6 gallons water, 6gallons vinegar and 12lbs salt lol. Here is the formula needed for either coyote, deer, or any other common game hide
1gallon of hot tap water = 1 gallon vinegar = 2lbs salt (stir until salt is pretty much dissolved into the water)
I can tell you from experience if using a bin like this you could get away with doing 3gallons water, 3gallons vinegar, 6lbs salt. Just remember that overall the skin needs to float in your container.
-put the hide into the mix and strir it around, summerging the hide, getting it good and soaked. ---leave hide in pickleing for 24-36hrs.
here is my write up for how i did things, this will start out with the tools and supplies i used and also from the very beginning (skinning) to the end (pelt is very, very soft)......
PRODUCTS/SUPPLIES

here is pic of my supplies and tools used. starting from left to right
-Van Dykes Lutan F kit ($30)= http://www.vandykestaxidermy.com/K7101-P177C207.aspx (i did not use this kit but will for my deer hides that i have)
-Mckenzie Deer Skin tanning kit with video/the package also has a bottle of tan and a bottle of oil, plenty to do a couple furs ($30)= http://www.vandykestaxidermy.com/DSK-P173.aspx (i recommend this for the beginner, this is the product i am using threw out this first project)
-Outfitters Game Processing Kit ($25). nice entry level kit, the scissors are great to have.
-Remmington 3pcs skinning knife kit ($35). i know nothing about knives. but these were very easy to use and fit my hands great. also the added bonus was the small hole in the end to keep on my finger when not using them. very nice knives!
-a container to "pickle" the hide. the hide must be able to float. a small 10gallon bucket could work for a coyote. i bought 2 big storage bins on sale after christmas for about $5 a piece.
-vinegar $1 a gallon
-salt--MORTON or SEA SALT i used both $.38
-Plastic gloves
-aprin or trash bag
-paint brush
optional--- small piece of 4" round PVC pipe (4 cost me $10) for me it was just about 2' long and a small piece of a 1"x6" board, and also a C clamp. these items together will make a great tool to help work on the hide. i recommend making something similiar because it would be hard work on a flat table.
PART 1

the hide i am working with is a young 1.5-2yr old female coyote, i shot her with my .223 about the first week of November and skinned her that night. i did not get to the skin till about a month later.
here is how I did my main cuts...
---have a nice sharp knife and have something to hang them like you are skinning/cutting up a deer--trust me this will save you time, espically if you are trying to get the entire head---
--start from the vent hole aka butthole and go all the way down its belly to his breast plate (lower part of neck). your needs to go threw that first thin layer of skin, you don't have to gut the thing.
*(FUR LINE= this is where the under belly color and main pelt colors start to meet)
--start at the hind legs first. finding a starting area on the hind leg either closer to the paw or higher up, what ever makes you sleep safe at night, that were to start. Cut around the leg at your mark. then cut along the fur line which runs along the back of his leg to its vent hole. repeat on the other leg.
--start pulling and cutting loose the pelt from the body and cut the tail off close to the base of the body. keep going till you get close to the front. since you are planning on tanning, keep as much "fat" on the body and not your pelt. trust me it will save you time.
--your next cut starts on the lower front legs or however high you want on the leg. cut all the way around the leg. starting from there go up along the fur line which runs kinda along the front inside of its legs, makeing your way up the leg to the cut you made from vent hole to lower neck. repeat on other leg
-- if you have made it this far, keep pulling and cutting its entire pelt down the neck till you get to the ears. cut around the base of the ears close to head. from there on just keep working your way around and pulling on the fur next thing you know it will all be off. from the lower neck to nose will look like a sock.
--lay the pelt out and start at the bottom of the tail cutting into the tail tissue and work your way to the tip. a sharp tip blade is really handy. you then should be able to grab the base of the tail tendon and pull upward BECAREFUL TOWARDS THE TIP, YOU COULD PULL THE END OFF, SO TRIM WITH KNIFE AS YOU GET CLOSE TO THE TIP OF THE TAIL.
--go to the bottom of the neck and start cutting straight up the neck to the bottom of the mouth. after my cuts were all done, i layed it all flat with meat side down and trimmed up things to look somewhat more symmetrical.
then take the skin and fold it so that the meat side touch each other (like folding a taco), roll the fur up and put in a trash bag and put it in the freezer till your ready. OR you can go buy some MORTON SALT or SEA SALT and cover the entire meat side. one 2lbs can of salt will cover thedog easily use it all. let the salt set for a couple hours (this allows to to "settle" in), then fold it up, roll it up and put it in freezer. i did not apply salt to mine, and got to tanning it about 1month later and everything still turned out fine, but salting it is the first step in tanning.
*****************
PART 2

Since i did not salt the meat side before freezing my hide, i removed the hide from the freezer, let it set for roughly 6hrs till thawed out and applied 1 can (2lbs) MORTON salt to the entire meat side, don't be shy with the salt,
let the hide set out in the open with the salt applied for roughly 10hrs. the salts job is to dry out the hide by absorbing blood, tissues, membrain that is left on the hide after skinning.
After the setting time scrape all the salt off the hide into a trash can.

Here you can tell where the 4round pvc pipe and board come in handy. I simply angled cut both ends so that it gives me a comfortable way to work. First I pre-drilled my holes and I ran five 3 long decking screws around the base, to hold secure along the bottom to the scrap piece of 1x6 I had. Take the part by placing the 1x6 on the table and use a C clamp to hold in place. On the end that was to my stomach I rounded the edge over with my grinder, just so I might not snag and accidently tear/rip the hide.

Simply lay the hide long ways and up by your stomach allow a little to hang over the PVC. Lean against that piece pinching the hide between your belly and PVC. Take your free hand and place it on the skin and pull it downward toward your table. This will help apply a little tension to make the cutting easier. When working on the hide work close to the body and work down roughly 4-6 at a time down. start removing the the first layer of membrain and tissue and or any fats that were left on after the skinning. This took me roughly 2hrs, but im sure on the next one it will go quicker because trust me, you get plenty of practice time in.

Here is what the first layer(s) should look like. The picture might not be the best but in some areas I got deep enough were I could see the roots of the hair. If you get this deep, it is a little too deep, try and not to go that far down, but really close to.
**if you kept the head on your skin; this is were a great pair of scissors comes in handy. You will want to trim the cartaledge out from behind the nose and up into the ear. I trimmed the nose so that when inside out it was pretty much level with hide. Also along the mouth cut the black lining close to the hide. Take your time and pay attention to your cuts.
After removing as much as I could, I layed the hide out on the table with meat side up and salted again, leaving it out in the open and this time I let the salt set 22hrs.
PART 3----PICKELING

This is where you will need your container, remember the container needs to be big enough so that the hide can float. In the picture I went way overkill on the amount it takes to get the hide to float (I was unsure due to the shape of the container, and being a first timer). I did 6 gallons water, 6gallons vinegar and 12lbs salt lol. Here is the formula needed for either coyote, deer, or any other common game hide
1gallon of hot tap water = 1 gallon vinegar = 2lbs salt (stir until salt is pretty much dissolved into the water)
I can tell you from experience if using a bin like this you could get away with doing 3gallons water, 3gallons vinegar, 6lbs salt. Just remember that overall the skin needs to float in your container.
-put the hide into the mix and strir it around, summerging the hide, getting it good and soaked. ---leave hide in pickleing for 24-36hrs.


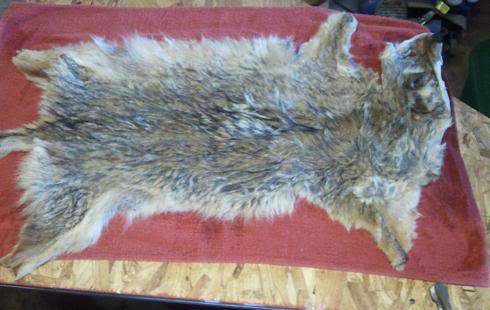
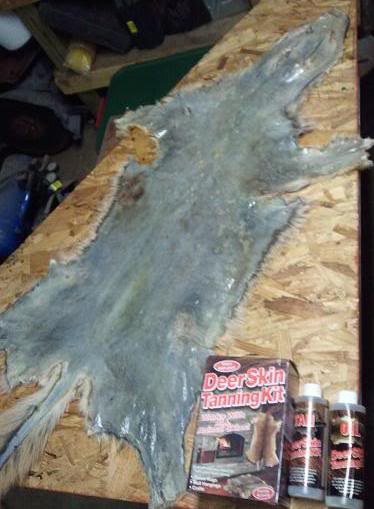

 , i wanted to do this because about this time of year the topic comes up and i never have seen/heard much into detail on what to do. so i wanted to keep the budget low incase i did not like doing this. overall it was not that bad, i am going to do my deer hide next, pretty similiar it looks to the coyote, just need to use more tanning and oil i'm sure. i ordered me a custom Gucci apron so i can style for the next one...


